
How To Embed Your Website In Facebook Page Tab
This Tutorial is for peoples who wondering about showing/embedding their vBulletin Forum in their Facebook page tab. so there Facebook fans easily access there web without leaving facebook.
Requirements1: SSL Certificate Installed on Main Website2: Facebook ApplicationGetting Started !2nd Step :
b) Now You are in Your Applications Area, where you can see/manage all of your Facebook application, In this area Look for “Create New App” and click on it
You will see a Dialogue Box Requiring Your App Info
App Name : This is your Application Name You can choose whatever name you like
App Namespace : This is your app url name, this does not cotain aqny spaces or slashes or dashes.
Note : Dont Check the Web Hosting Option, because we are going to show our website from our own existing hosting, we dont need free hosting from facebook
Now Click on ” Continue” you will see a security captcha, fill that and move on next
Now we will configure our application to be installable on facebook page tab. A Facebook app is loaded with lots of option for varuous purpose but we need only 2 options here that we need for our current requirements. (i) App on Facebook (ii) Page Tab.
Now Click on App on Facebook & Page tab to Expand The Options and fill out the settings with your website information
Now we are going to Install it as our page tab.
Navigate o new tab in your browse and enter the Following URL with your App ID & App URL
https://www.facebook.com/dialog/pagetab?app_id=YOUR_APP_ID&next=YOUR_URL

Congratulation! You have successfully installed your facebook application and page tab. now you can preview it. Subscribe To My Blog and RSS Feed to get updated with more unique stuff.
1st of all we need an SSL Certificate installed on your main website, because Facebook requires it for showing your website within Facebook iframe. if you don’t have it the users who have enabled secure browsing on Facebook which is i think more than 90% doing, the cant see your website. You can Buy cheapest SSL Certificates from Godaddy
You can Use This Coupon Code to get 20% OFF your order ” WOWxitoff2 “
Now we are going to setup our Facebook application that will be going to use for our facebook page tab.
a ) Navigate to “https://developers.facebook.com” You will see the following screen, Click on Apps Tab


Your Box After Filling all valid information looks like this.

Now we have successfully created our facebook application and now your are on your app management option. Here you can see you app ID and secret key, dont share it with anyone.


Now you are done, hit SAVE CHANGES, we have now succesfully created and setup your application, youcan test it by going to your application URL which is showing at top in this settig page like“http://apps.facebook.com/yourapp” you will see your website loading in facebook frame.
You will see following box, now select your page where you want to install this tab and hit on Ad Page Tab.

Fake Facebook Security Team hacking accont
An account posing as that of the Facebook Security Team has been found sending warnings to page owners, trying to fool them into believing that their Facebook account will be suspended due to a violation of the Terms of Service.


The message offers a link for verifying the account and it takes users to a third party Facebook application that requests them to enter their Facebook page name, email or phone and password.
If entered and submitted, that information is automatically sent to the scammers behind this phishing scheme and used to hijack the account.
If you have fallen for the trick, try to access your account. If you are able to do so, change your password immediately. If you have already been locked out, report the compromise and Facebook will help you regain control of the account.
Anytime you see a Facebook page in the following format: apps.Facebook.com/appnamehere you should know that you are NOT dealing with an application created by Facebook. Scammers use official sounding page names, applications and links to make their schemes appear legitimate to unsuspecting and ill-informed users."
How to Bypass g mail verifcation
Google need mobile verification for his new user so if you cant verify you account you can not use Google service here is trick to Bypass or skip mobile verification and make account on Google without verification just follow Steps

Follow these steps :
Step 1:
Go to K7 and log in if you have account other vise complete the sign up process which is short then log in there. In this site you have facility to receive fax or voice calls without using any phone number.When you create an account there, they will provide you a unique phone no of United States.
Step 2.
Go to G mail to create a new account, Fill all information honestly but in country select United States and after that click on Create account don't forget to check boxes of term of services and agreement.Step 3.
when you click on the create account button there will open a new page which ask you to verify yourself, There will be two options :
Message verification.
Call Verification.
Select Call verification and enter the number you got from Step 1.
Message verification.
Call Verification.
Select Call verification and enter the number you got from Step 1.
Step 4.
Go to K7 there fill be a file for you, download the attachment file and listen the code.
Step 5:
Enter this code in verification Box. and Click verify.
your account verification is complete now you can use your account.
This is how to verify G mail account with out having mobile
your account verification is complete now you can use your account.
This is how to verify G mail account with out having mobile
Window 8 Beautiful Themes

Caribbean Shores Theme
A beautiful window 8 theme which is free my Microsoft to its user contain sight of Africa sea shore, and forests.


Dusk and Dawn Theme
The rosy light of dawn creeping over a mountain range as the world wakes up. The twinkling lights of a big city over a descending sun. The early morning silence of a tree-lined canal. This free theme for Windows desktop invites you to enjoy those hushed moments when day gives way to night and night gives way to day.


Nature Macros theme by Mike Swanson


Add Static Facebook Pop Out Like Box with Smooth Jquery
Facebook is a good source of increasing traffic in blogs and allow users to subscribe and view your updates easily. So here is Facebook's jquery pop up for Facebook like box widget for bloggers.
Advantage is that this widget frees space on the page and this gets hide on the right side of the page and come out whenever mouse is put on it. Because Facebook can prevent website normal as the box. Static Pop Out Facebook as soft box with j Query effect of activation for the blogger gives a feeling of another cool control.
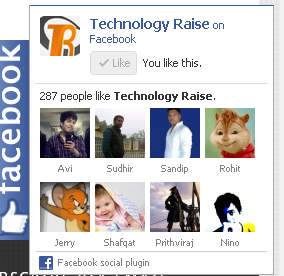
Here we have added the box with simple j Query hover effect. See Facebook static plate to the right of the page and move the mouse over the plate with the frame, it will be visible while sliding to the left.
This is how the gadget looks like and you can view it on right side of the Pane:
a. Go to Blogger Dashboard.
b. Go to template tab
c. Click on Edit Html Button

And now click Save Template


b.Add a below code in the Html/java scipt box.
Replace my Facebook page URL below with the URL for your page.
(Note:- Facebook URL Must starting with "http://" and it contains no space or illegal Characters )

And now click Save
Note:-Don’t forget to change Red colour keywords with your url of Facebook Page.
Advantage is that this widget frees space on the page and this gets hide on the right side of the page and come out whenever mouse is put on it. Because Facebook can prevent website normal as the box. Static Pop Out Facebook as soft box with j Query effect of activation for the blogger gives a feeling of another cool control.
Here we have added the box with simple j Query hover effect. See Facebook static plate to the right of the page and move the mouse over the plate with the frame, it will be visible while sliding to the left.
This is how the gadget looks like and you can view it on right side of the Pane:

Now we show you Steps to how to Add this in your Blog also
STEP 1:
Adding Jquery JavaScript Plugin(Ignore this step if your blog have already a Jquery Plugin)
a. Go to Blogger Dashboard.
b. Go to template tab
c. Click on Edit Html Button

d. After click on button edit Html button.
e. press Cltr+f
f. Search </head>
d. Add below line of code Before </head> tag
<script src="https://ajax.googleapis.com/ajax/libs/
jquery/1.6.1/jquery.min.js" type="text/javascript">
</script>
And now click Save Template
STEP 2: Adding Widget Code ( Html code )
it's Simple
a.Layout or page elements –>> Add a gadget-
it's Simple
a.Layout or page elements –>> Add a gadget-

Select Java script Now

b.Add a below code in the Html/java scipt box.
Replace my Facebook page URL below with the URL for your page.
(Note:- Facebook URL Must starting with "http://" and it contains no space or illegal Characters )

<a href="http://msajawalyounas.blogspot.com" target="_blank" title="Blogger Widgets"><img src="http://safir85.ucoz.com/24work-blogspot/cursor-24work-10.png" border="0" alt="Blogger Widgets" style="position:absolute; top: 0px; right: 0px;" /></a><script type="text/javascript">
//<!--
$(document).ready(function() {$(".w2bslikebox").hover(function() {$(this).stop().animate({right: "0"}, "medium");}, function() {$(this).stop().animate({right: "-250"}, "medium");}, 500);});
//-->
</script>
<style type="text/css">
.w2bslikebox{background: url("https://blogger.googleusercontent.com/img/b/R29vZ2xl/AVvXsEhK54VFW4YhHLT_8UcQGGx_rVEtNM7EK-c7J1zgeM1XeP6TtXTJc4AQ-al9nH4HsDqw31rRIjgJB3tNmpDyYqOtmah5t6HxdLip3NMjKgWCcqffRvycDLpyuy6oH4OENs_2Cu_onSvV08Gp/s1600/facebookbadge.png") no-repeat scroll left center transparent !important;display: block;float: right;height: 270px;padding: 0 5px 0 46px;width: 245px;z-index: 99999;position:fixed;right:-250px;top:20%;}
.w2bslikebox div{border:none;position:relative;display:block;}
.w2bslikebox span{bottom: 12px;font: 8px "lucida grande",tahoma,verdana,arial,sans-serif;position: absolute;right: 6px;text-align: right;z-index: 99999;}
.w2bslikebox span a{color: #808080;text-decoration:none;}
.w2bslikebox span a:hover{text-decoration:underline;}
</style><div class="w2bslikebox" style=""><div><iframe src="http://www.facebook.com/plugins/likebox.php?href=http://www.facebook.com/pages/techraise&width=245&colorscheme=light&show_faces=true&connections=9&stream=false&header=false&height=270" scrolling="no" frameborder="0" scrolling="no" style="border: medium none; overflow: hidden; height: 270px; width: 245px;background:#fff;"></iframe><span>By <a href="http://msajawalyounas.blogspot.com/">Blogspot tutorial</a> / <a href="http://msajawalyounas.blogspot.com/">+Get This!</a></span></div></div>
</div>
//<!--
$(document).ready(function() {$(".w2bslikebox").hover(function() {$(this).stop().animate({right: "0"}, "medium");}, function() {$(this).stop().animate({right: "-250"}, "medium");}, 500);});
//-->
</script>
<style type="text/css">
.w2bslikebox{background: url("https://blogger.googleusercontent.com/img/b/R29vZ2xl/AVvXsEhK54VFW4YhHLT_8UcQGGx_rVEtNM7EK-c7J1zgeM1XeP6TtXTJc4AQ-al9nH4HsDqw31rRIjgJB3tNmpDyYqOtmah5t6HxdLip3NMjKgWCcqffRvycDLpyuy6oH4OENs_2Cu_onSvV08Gp/s1600/facebookbadge.png") no-repeat scroll left center transparent !important;display: block;float: right;height: 270px;padding: 0 5px 0 46px;width: 245px;z-index: 99999;position:fixed;right:-250px;top:20%;}
.w2bslikebox div{border:none;position:relative;display:block;}
.w2bslikebox span{bottom: 12px;font: 8px "lucida grande",tahoma,verdana,arial,sans-serif;position: absolute;right: 6px;text-align: right;z-index: 99999;}
.w2bslikebox span a{color: #808080;text-decoration:none;}
.w2bslikebox span a:hover{text-decoration:underline;}
</style><div class="w2bslikebox" style=""><div><iframe src="http://www.facebook.com/plugins/likebox.php?href=http://www.facebook.com/pages/techraise&width=245&colorscheme=light&show_faces=true&connections=9&stream=false&header=false&height=270" scrolling="no" frameborder="0" scrolling="no" style="border: medium none; overflow: hidden; height: 270px; width: 245px;background:#fff;"></iframe><span>By <a href="http://msajawalyounas.blogspot.com/">Blogspot tutorial</a> / <a href="http://msajawalyounas.blogspot.com/">+Get This!</a></span></div></div>
</div>
And now click Save
Note:-Don’t forget to change Red colour keywords with your url of Facebook Page.
iOS 6 vs Android 4.2 Jelly Bean Features comparison.

iOS 6 - Its is a Multitasking OS having supported devices from last 3-4 iterations of iPhone ,iPod touch , iPad and iPad Mini.Some important features are there like-its has seamless instant messaging through iMessage. Through iOS 6 we can manage call by do not disturb , Remind me later , quick reply with text.Its has notification Center Widget.It does not support VoIP but provide third -party solution .Provide Video calling over WiFi/3G .Make Contacts through Facebook and twitter integration.Its also support Dictation. For text input it have split keyboard in iPad . It support Notification , Camera shortcut and slideshow on iPad at Lock screen . It has Mobile Safari as browser , notes app , Apple Maps(3D, cached, turn-by turn voice guided navigation), Passbook for Mobile payment or Ticketing system .iCloud for cloud sync & Backup ,Provide OTA updates , Games center for Social Hub for gaming .Provide Anti-theft Solution , Native Screenshot support and also allow to create folders.Integration with Mac OS X desktop platform.
Also Read Direct Download iOS 6.0.1 For iPhone, iPad, iPod touch
Android 4.2 Jelly Bean - It is also Multitasking OS or we can also say a true multitasking ,support large variety of Devices . Its has Widgets at home Screen, lock screen ,notification drawer & third -party .Message threads with Profile Picture and contact card and IM through GTalk. Support Call Management through Quick reply with text. VoIP through Google talk and Google voice and third party integration in dialer ,Support Video calling through Google talk over WiFi /3G. Create Contacts by integration with third -Party Social media application.Voice Control through Google Now ,Text input with Predictive Keyboard with Gesture input Supports Photography in Photo spheres,Ponoramo mode and photo Editing through FX, filters ,crop ,auto enhance and red-eye removals. Having Default browser on phone, for mobile Payment or Ticketing system Support Google Wallet ,also allow Bluetooth Files transfer ,Provide OTA updates ,Provide notification management by App-by-App ,Provide music Service through Google Music .Moreover It also allow Native Screenshot Supports , Help in creating Folders ,Live and interactive wallpapers as well as allow developers Options.
How to insert Youtube video in PowerPoint.

Embed YouTube Videos Directly into PowerPoint

1 Download and install the YouTube wizard plug-in the the given link.

Now you simply have to type the URL of the Youtube Video and follow the wizard to embed the video in your current PowerPoint slide.Moreover if you want to resize and change the position of the Video Player .
Play YouTube Videos in PowerPoint without Internet
In this you can direct add the video in your PowerPoint Presentation and it will run there you dont have to depend upon the internet speed and connection.To add Video in powerpoint persentation follow the following steps
1 Download the Youtube Video in window Media or AVI format as all other format doesn't understand by PowerPoint .
2 Once video is saved in AVI or wMV format then open the powerpoint and choose Insert and Movie then "Movie from file " to add Youtube video.
Credit URL-http://office.microsoft.com/en-in/powerpoint-help/embed-in-or-link-to-a-video-from-your-presentation-HA010374729.aspx
Direct Download iOS 6.0.1 For iPhone, iPad, iPod touch

Hello guys.Apple released an update to iOS 6.0, to iOS 6.0.1 to resolve the bugs in iOS 6.0.According to the various sources, the new iOS 6.0.1 has been released for iphone ,ipad and iPod Touch.Following are the issues which are resolved.
1 Fixes a bug that prevents iPhone 5 from installing software updates wirelessly over the air
2 Fixes a bug where horizontal lines may be displayed across the keyboard
3 Fixes an issue that could cause camera flash to not go off
4 Improves reliability of iPhone 5 and iPod touch (5th generation) when connected to encrypted WPA2 Wi-Fi networks
5 Resolves an issue that prevents iPhone from using the cellular network in some instances
6 Consolidated the Use Cellular Data switch for iTunes Match
7 Fixes a Passcode Lock bug which sometimes allowed access to Passbook pass details from lock screen
8 Fixes a bug affecting Exchange meetings
9 Fixes Wi-Fi connectivity Fixed.
To do the install the update to iOS 6.0.1 , you can launch iTunes and update or update wirelessly. To do that go to the setting menu and press software Update .Here are also the direct links to download iOS 6.0.1 for iPhone, iPad, iPod touch
iPhone
iPod Touch
iPad