
Showing posts with label computer. Show all posts
Showing posts with label computer. Show all posts
How to close an app in Windows 8
There is a new feature in Microsoft windows 8 that your open apps are remain open at last your computer shutdown. In Microsoft windows 8 they get rid of the file menu, close, minimize, and resize choices and give another feature which is app command. The bar of app command is place at the bottom of the screen and you can select it with right click.

In Microsoft windows 8 there is a option to open the app but they don’t provide you the choice to close the app if you want to close app then we have some ways to do this. Follow the instructions below.
· Shift the mouse to the extremely peak of the app that must transform the mouse arrow in a hand, then click and drag or else take that app to the underneath of the display. just the once you permit leave of the app it will close up.
· There is also a simple option that you can press Alt+F4 to close the app or any other program you want.
· WHEN YOU CLICK WINDOWS BUTTON WITH Tab then app will appear click on the app and close it.
Top 10 free proxy software's
The people used the Free Proxy Software's to entrance to the blocked and forbidden websites, Proxy is a free of charge plan that permit you to protect your connection during surfing. The big amount of users uses it to open those sites which are blocked in their country by some reason.
For using proxy you have to choose good proxy software, if your software is not good then you have many problems with your internet so here I am going to tell you about those proxy softwares with which you can run proxy surfing without any problem.
Below are the 10 free proxy softwares
1. Freegate
The Freegate proxy software is very easy to use because it uses English as well as Chinese language this software can run and download without installation.
As soon as Freegate starts, it will without human intervention open Dynaweb home page and you can turn off this page in the settings.

2. UltraSurf
This software is also easy software and it can run on your device without any installation. Also this software supports both languages English and Chinese.
When this software starts an ultra home page automatically open but you can stop it by changing the settings.

3. GTunnel
Same as the above two softwares the GTunnel also support both English and Chinese language. There is a very interesting feature in this software that you can run this software as your Gtalk. This software opens a Garden Networks homepage when it runs.

4. Tor
This proxy software can support many of languages French, Chinese, English etc.if you are using a window you have to use it with Tor Browser Bundle or Vidalia Bundle to run this software. However for the most part of the time, you in addition require to put in some bridges.

5. GappProxy
This software is foundation on Google App Engine, this software only support Chinese language. To run this software most of the time you should download a GappProxy windows client but sometime you require making a fresh FetchServer with Google App Engine.

6. Hyk-proxy
This softaware is also free and easy. This software is also based on Google App Engine and it supports only Chinese instruction but you can saw its English instructions at Google translator.

7. Your Freedom
If you want to use this software you should simply go to freedom website and create an account there and install the software and use proxy. The configuration of your freedom will acquire a small number of minutes, but robotically.

8. GPass
You just download and run this software to you proxy. There is another feature that you can use this on Skype and tar account.
9. Tunnelier
If you want to use this software then you must need a SSH account to make use of the free proxy software Tunnelier.
In support of SSH account, you be able to make use of your own hosting, or look for a free account.

10. Hotspot Shield
Hot spot shield is a very vast range software and it supports many languages like English, French and Chinese and Hotspot Shield furthermore supports Arabic, Persian, Russian and Vietnamese.

How To Install PHP with Apache (Part 2)

Configure PHP
- If you don’t have it on your system, you can download it from here http://windows.php.net/downloads/releases/archives/php-5.3.5-Win32-VC6-x86.zip.
- After download, create a directory named php5 in your C: drive, then extract all its contents to “C:\php5″. It will look like this

- Now locate php.ini-production in C:\PHP5 then rename it to php.ini

- Now open php.ini and locate extension_dir directives, uncomment and change the value into

- Next you need to find output_buffering, in same php.ini file, and change it to

- Now locate php_bz2.dll, php_mbstring.dll, php_mysql.dll, and php_mysqli.dll and uncomment them.

- We are done with the php.ini configuration,
- Now we have to configure the Apache, for this open the apache configuration folder at location C:\Program Files\Apache Software Foundation\Apache2.2\conf which is by default.
- Open the file Httpd.conf, from that folder and make following modifications to it.
- Un-comment expires_module, headers_module, rewrite_module and then add

- Add: (with other AddType block)

AddType application/x-httpd-php-source .phps
- Locate
DirectoryIndex index.html index.htm index.php

- Now Save and close that httpd.conf file.
- Now we need to set enviroment variables. For that….
- Click on Start> Right click My computer Icon> Select Properties> On pop-up window, go to Advaced Tab> Click on environment variables

- Locate Path under System Variables and then double click on it then add

.jpg)
- Further in Environment Variables, next you need to click New Button and then add

.jpg)
- Click OK>OK to save the settings.
- Now we’re done, let’s begin the test, if all this works or not.
- Go to C:\Program Files\Apache Software Foundation\Apache2.2\htdocs create a new text file inside that directory named test.php (NOTE: Do check the extension, .txt won’t work) and open it with notepad then add this
- Now save all your work and restart your machine.
- After reboot, open up your Browser, and type following in the address:

- If the following page appears, congratulations!!!
How to Create Wifi Network Without Router
Window 7 and 8 users can set up their own WiFi Network without using a Router,Using this they can share their internet connection to other computers, smartphones and mobiles.This will benefit you if you have smart phone or other computer in home/office and want to share Internet connection.
Follow simple steps below to make WiFi network without Router:

Step 1:
This works only on window 7 and window 8. So you have to up grade your window if you using old version of a window,There must be an active internet connection which you want to share over WiFi to other computers or smart phones.
Step 2:
Now a days computer's have built in enabled WiFi capabilities. If your computer is not so old then it must also have WiFi enabled but if your computer is old then you have to buy a USB Network card to share internet with others.
Step 3:
If you complete all the requirements in starting two steps then install a Utility software called Virtual Router which is free to use. Download it and install it. After installation Run virtual Router. Now First time chose your network name and set password after that Start Virtual Router and now this network is available for other computers to connect, Now they can use your Internet connection .
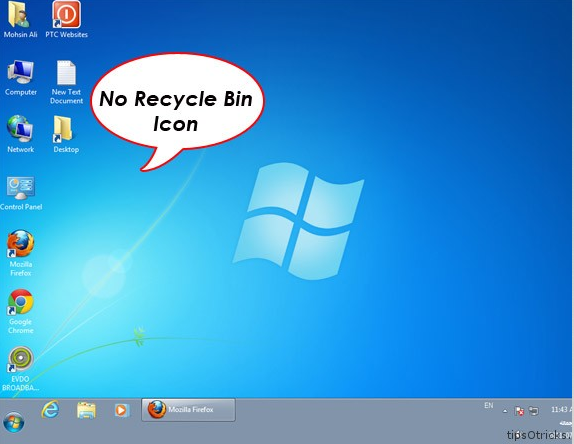
HowTo Remove Recycle Bin from Desktop
Recycle bin is a default icon of Desktop and is present when you install window and cant be deleted as others icons which are simple to delete. If you want to delete Recycle bin From your Desktop Follow simple Commands to Remove it from your desktop.
Follow Steps to Remove Recycle Bin:

1.Go to Start.
2.Select Run.
3.Type gpedit.msc and Hit Enter.
4.Select user configuration from left pane.
5.Now Select Desktop.
6.Now Double click Remove recycle Bin from desktop which will be on Right Pane.
7.Change it Enable and Apply.
8.Now go again to Start Select Run Type gpupdate.exe and press Enter.
9.Restart System.
Now Recycle Bin will be removed from your Desktop.

How to Enable Task Manager disabled by Administrator or Virus in Windows
Windows Task Manager is used to view details about processes running on your computer. Since it can be used to terminate programs that are misbehaving or are viruses disguised in the form of harmless programs, most spyware and viruses disable it to prevent themselves from being closed through it. Some administrators also disable Task Manager to prevent users from closing important security programs like antiviruses and anti-malwares.
In such situations, running the Task Manager will give the "Task Manager has been disabled by Administrator" error. However, there are some techniques you can use to re-enable task manager and close those harmful programs manually. This article contains few such simple techniques you can use to regain access to Task Managing privileges.
Registry Editor is an inbuilt Windows tool that is used to modify registry keys which tell Windows how it should work. A simple registry modification can be used to bypass the Task Manager block. To do so, just follow the steps:-
Click on Start. Go to Run. If you use Windows 8, Windows 7 or Windows Vista, go to Search.- Type regedit and press Enter. Registry Editor will start. If Registry Editor is also disabled, you will first need to enable registry editing.
- Through the left hand navigation pane, navigate to HKEY_CURRENT_USER\Software\Microsoft\ Windows\ Current Version\Policies\System. If the System key is not there, you will need to create it.
- In the work area, locate "DisableTaskMgr". If this value is not there, you will need to create a new DWORD value called DisableTaskMgr. Double click on it. A window will pop up.
- Enter its value data as 0 and press OK.
- Close Registry Editor. If Task Manager is still disabled, restart your computer
ENABLE TASK MANAGER FROM GROUP POLICY EDITOR (GPEDIT.MSC)
Group Policy Editor is a feature in Windows which is used to edit local policy settings. It can also be used to enable Task Manager. To do so, just follow the steps given below:-
ENABLE TASK MANAGER BY RUNNING A CMD COMMAND
Command Prompt can also be used to directly enable Task Manager.
If you are unfamiliar with manually editing the Registry, you can create a Registry file which will automatically modify the Registry Key to re-enable Task Managing. To create one such file:-
 |
| Windows Task Manager in Windows 7 |
- Open Start Menu. Windows XP users click on Run. Windows 8, Windows 7 and Vista users, go to Search.
- Type gpedit.msc and press Enter. Group Policy Editor Window will show up.
- From the navigational pane at the left hand side, go to: User Configuration>Administrative Templates>System>Ctrl+Alt+Del Options.
- In the work area, double click on "Remove Task Manager" and set its value to Disabled or Not Configured.
- Restart your Computer or Log Off and Log back On to apply the changes.Group Policy Editor is not available on home editions of Windows.
ENABLE TASK MANAGER BY RUNNING A CMD COMMAND
Command Prompt can also be used to directly enable Task Manager.
- Open Notepad.
- Copy the code given below and paste it.
- Save the File as TaskManager.bat.
- Run TaskManager.bat as Administrator if you use Windows 8, Windows 7 or Windows Vista. In Windows XP, simply open the file. A command prompt window will flash for a second and then disappear indicating successful execution. After running the batch file, you will be able to again use Task Manager. If Task Manager is still not available, restart your computer.
If you are unfamiliar with manually editing the Registry, you can create a Registry file which will automatically modify the Registry Key to re-enable Task Managing. To create one such file:-
- Open Notepad or any other text editor.
- Copy the code given below and paste it as it is in it.
Windows Registry Editor Version 5.00 [HKEY_CURRENT_USER\Software\Microsoft\Windows\CurrentVersion\Policies\System] “DisableTaskMgr” =dword:00000000
- Save the file as Enable Task Manager.reg or *.reg.
- Open the file by double clicking on it.
- Registry Editor will ask you for confirmation. In the confirmation Window, click Yes.
- Task Manager would immediately be accessible. If it is not, restart your computer.
How to Disable USB ports on Windows PC via Registry
Using this trick, you can disable access to your USB(Universal Serial Bus) ports in your Windows based PC to prevent people from taking out data from your personal computer without permission or spreading viruses through the use of USB(pen and flash) drives.
To use this trick to disable USB ports, follow the steps given below:-
- Click on Start.
- Click on Run. If you cannot find RUN, type it in the search box.
- Type "regedit" without quotes. This will launch the Registry Editor.
- Navigate to HKEY_LOCAL_MACHINE\SYSTEM\CurrentControlSet\Services\usbstor.
- In the work area, double click on Start.
- In the Value Data box, enter 4.
- Click on OK.
- Close Registry Editor and refresh your desktop.
- To re-enable access to your USB ports, enter 3 in the Value Data box in Step 6.

Note: This trick also disables access to your USB connected peripheral devices. So, do not use it if you have USB connected keyboard and mouse.
How to Make Undeletable, Unrenamable Folders
Basic Concept The basic concept behind this trick is the use of Keywords. Keywords are reserved words in any programming language that cannot be used as names of variables. Windows also uses certain keywords in its programming. Some of them are con, aux, lpt1, lpt2, lpt3, lpt4, lpt5, lpt6, lpt7, lpt8 and lpt9.
A TestTo test this concept, make a new folder in Windows and try to give it a name same as any keyword suggested above.
ResultWindows will not rename your folder to any of the keyword given above.
TrickSo the question arises, how can we make a folder with a keyword as its name? The solution to this problem is included in Windows itself. As we know that Windows has evolved from D.O.S.(Disk Operating System), its commands can be used in Windows. You can use D.O.S. Programming in Windows to create a folder with a keyword as its name using the steps given below:-
- Click on Start.
- Click on Run. Type in "cmd" without quotes.
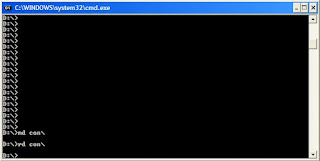
- In the Command Prompt Window that opens, type the name of the drive you wish to create your folder in the format <drive-name>: and press Enter. e.g. If you wish to create the undeletable folder in D drive, type "D:" without the quotes. Note that the folder cannot be created in the root of C:/ drive (if C: is your system drive).
- Type this command- "md con\" or "md lpt1\" without the quotes and press Enter. You can choose any of the keywords given above as the name of your folder.
Although it is not possible to manually delete the folder, you can delete the folder by typing "rd con\" or "rd lpt1\" in Step 4 instead of "md con\" or "md lpt1\".
Windows Compatibility: This works on Windows XP, Windows Vista, Windows 7 and Windows 8.